Photoshop Comp Exercise 3
- Cade-Mason
- Oct 13, 2020
- 5 min read
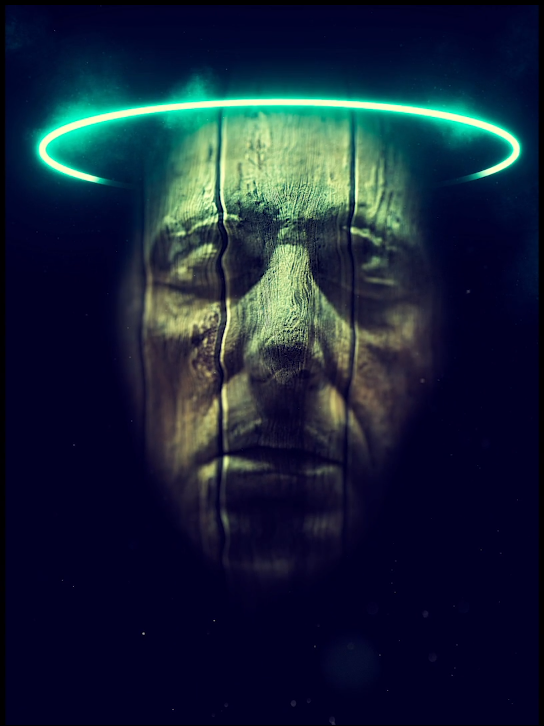
For the third composition practice, this is the final image for the composition and I had to work my way through in order to capture this composition image:
These were the images I had to work with:


I opened a new document in Photoshop with the settings at: 2000 x 3000 pixels, 72 resolution, Adobe RGB (1998) with a black background and portrait orientation for the composition. Afterwards, I opened a new image by going to file > place embedded. The file I needed was the head sculpture image (reno-lath), scaled the image to completely fit the image and then converted to a smart object. Once that was out of the way, I needed another image so I did file > place embedded.


I placed the 'nucly-wood-37' layer in photoshop, rotated the image and transformed the image's scale size to completely fit in the composition and then scaled the image to zoom in the image where I needed it to be. Its blending style is 'multiply' and I moved the image to where the wood lines would meet and align with the eyes. Afterwards I rasterised layer on 'nucly-wood-37'. I went back to 'normal' blending node though after using the patch selection tool I went back to 'multiply' blending node.


Around this image, I used the patch selection tool

The next thing I had to do was I had to duplicate the head/face sculpting layer. By doing 'image > duplicate', I opened the image into a different tab. Rasterised the layer then did 'image > adjustments > Black and White'. Once that was done, I added a new 'curves' layer. In the 'RGB' channel, I added axis points to increase the dark and decrease the light. Once modified, I added a new set of curves to the composition. Next thing I did was I added a 'gaussian blur' blur to a radius of 12 pixels. This would still show the face but blur out most of the background.


I converted the layer into a smart object then I did "filter > distort > displace." This displacement image would be the image I darkened and dropped the shadows in the image. I changed the horizontal scale and vertical scale values up. I split the image up and duplicated the image by creating another mask for the layer. Copied the same layer however the blending node I chose was a "soft light" node.


The next thing I did was I used the "curvature pen tool" which I would use around the head. This tool helps to create axis points around the points of the head if you stretch them out, you can curve them and create new anchor points. Once I was satisfied with what I had, I did "make selection". Having done this, I created a new layer afterwards and did "select > inverse."


Once inverse was selected I filled in the selected layer and changed the opacity of the layer itself. From there I used a new brush tool and added a layer on top of it. For the new layer, I used the brush tool to paint over the selection around the edges of the head/face. Once brushing was done, I clicked on the "nucly-wood-37" layer for the smart object. Once I did transformations for the "nucly-wood-37" layer I saved it. The reason why I did transformations for this layer was to maintain the accuracy and to blend it right into the wood gods face. Having created a new layer, I got all the layers I had (minus the new layer I had created) and copied all those layers into the new layer itself. The new layer is called "merged" and afterwards created a new layer called "depth of field". Going through the depth of field layer I painted over with a purple colour in 10% opacity.


Once that was painted I noticed that I didn't paint over all of the black backgrounds so I filled in the rest of the background. Therefore, I had to take a step back from the composition. Now going back to the "depth of field" layer, I painted over the eyes, nose, mouth and chin. Painting those over again would give more focus on the composition itself. The more you paint over the same area, the more attention and focus it has. Once painted, I changed the layer 3 color background to white. From there I had locked the "depth of field" layer. I used the eraser tool around the areas (@ opacity of 10%) Afterward I used the 'lens blur' tool and played around with the settings until I was satisfied with the way the blur was presented. Then I created a new layer and used the elliptical marquee tool. It took a few attempts as I was trying to balance out the area and rule of thirds to create the circle which would then be the 'halo' image.


Once the circle was created, I did 'edit > stroke' the stroke's width is 20 pixels and colour for the halo is white. I masked the halo layer and used the back colour brush to brush out the back of the halo. This would result in the halo itself is going back behind the wood gods head. Once brushed, I copied the 'halo' layer using 'CTRL+J'. I used the gaussian blur tool for all the glow layers. Now for the individual layers from glow, all the way from 0-6 will be small glow, then all the other glows would be a big glow. Furthermore, the big glow blending node would be changed to 'screen' and hue/saturation values would be changed to a bright blue colour. Once that was done I copied the big glow layer and used the gaussian blur tool again. Afterwards, I created a new layer and used the brush tool and colour I selected came from the colour picker tool. This selects the colour you've selected onto a certain pixel. I brushed over the eyes, nose, mouth, chin and some of the lower cheeks of the face and changed the blending node to 'screen'. I doubled clicked onto the layer, opened up 'layer style' and changed the values for underlying layers in blending options.
Once that was done I wanted to create an atmosphere around the halo area. I went into the brush settings and chose 'Advanced Fog 02'. Now I do see that I did exaggerate the smoke of the halo a bit too much but I thought it looked nice enough and then I selected 'Medium Dust 2' brush and started doing touches over to the fog of the halo. I opened a new image by doing 'file > place embedded' and grabbed the 'water-22' file. Once transformation and rotations were done, I changed its blending node to 'screen'. I created a new 'curves' layer and changed the values in the channels of 'blue' and 'RGB'. I added a new layer and used the 'high pass' filter to do this go into 'filter > other > high pass' I changed the high pass to 3 pixels, chose the layers blending node as 'Linear Light' and turned down the opacity.


Overall, this was a great composition exercise and I managed to get on with the work independently with the assistance of the video itself. Our teacher wasn't around to help us at that time so I managed to work independently.


Comments