After Effects workshop: Creating a VHS Footage
- Cade-Mason
- Sep 21, 2021
- 4 min read
Updated: Jan 21, 2022
In preparation of creating our own VHS like footage for our own board game commercial, Leigh needed us to get up to speed using Adobe After Effects. I downloaded a video from Motion Array Opening After Effects I changed the video resolution settings and scaled up the video from 100% to 150%.


1) RMB in Composition timeline -> new Create Adjustment Layer (Name ADJ01) I added a new adjustment layer after the video to overlap the effect. From there I added the lumetri color under "Effect > Color Correction > Lumetri Color"
Lumetri Color (To degrade / fade our HD footage) In Creative section
-> Increase Faded Film (+50), decrease sharpening (-50)
-> Curves (Clip Whites and Blacks / add keys to keep gradient the same shape and lower dynamic range)
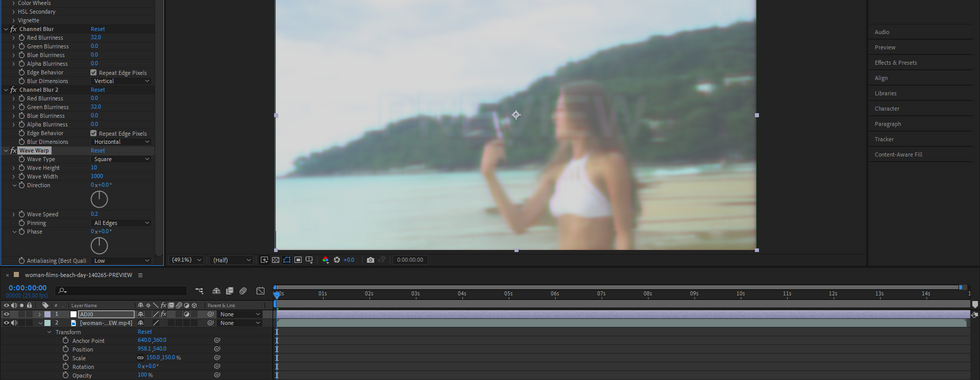
After Lumetri Color, I added channel blur twice by going to "effect > blur and sharpen > channel blur. One of which is Red (32) and vertical and the other is Blue and horizontal both of which need repeat edge pixel.
3) ADD -> Channel Blur (to shift / split colour channels)
-> Set RED to 32, Set Dimension to Vertical, enable Repeat edge pixel
4) ADD -> Channel Blur(to shift / split colour channels)
-> Set BLUE to 32, Set Dimension to Horizontal, enable Repeat edge pixel After adding Channel Blurs, I added Wave Warp under "effect > distort > wave warp." For the wave warping, I setted the following:
Wave type: Squad
Wave width: 1000
Wave direction: 0
Wave speed: 0.2
Pinning: ALL EDGES
5) ADD -> Wave Warp (to add tracking lines / banding across image)
-> Set wave type to SQUARE
-> Set wave width to 1000
-> Set wave direction to 0
-> Set wave speed from 0.1 to 0.2
-> Set Pinning to ALL EDGES


Once Wave Warp was added, I added Noise. "Effect > Noise and Grain > Noise." I set the amount to 10%.
6) ADD -> Noise (to further degrade footage)
-> Set amount to 10% and adjust accordingly
Once Noise was added, I added a mosiac effect under "Effect > Stylize > Mosiac". I set the width to 1000 and height to 500 but I adjusted those settings instead to width 850 and height 500
7) ADD -> Mosaic (to pixelate footage indicative of inferior camera recording resolution)
-> Set Width to 1000
-> Set Height to 500
-> Adjust accordingly to gain the desired resolution look
I added an Unsharp Mask by "Effect > Blur and Sharpen > Unsharp Mask". I set the amount to 100 and radius to 25. This is to crunch the footage in order to make it look compressed.
8) ADD -> Unsharp Mask (to 'crunch' the footage making it looked compressed)
-> Set Amount to 100
-> Set Radius to 25
In the composition, I added a new Adjustment Layer. For the new Adjustment Layer I added another "wave warp" effect and set it to the following settings:
-> wave type: NOISE
-> wave height to 10
-> wave width to 20
-> wave direction to 0
-> Pinning to ALL EDGE Once settings were adjusted I splitted the track every 2 seconds to have a consistent wave warp going on and off for the viewer. I did CTRL + SHIFT + D to split the track up.
9) RMB in Composition timeline -> new Create Adjustment Layer (Name ADJ02)
10) ADD -> Wave Warp (to add further tracking issues)
-> Set wave type to NOISE
-> Set wave height to 10
-> Set wave width to 20
-> Set wave direction to 0
-> Set Pinning to ALL EDGE
-> REMOVE sections by placing the Current Time Indicator (Playhead) in desired locations and pressing:
CTRL + SHIFT + D to split the track up; delete sections so that the layer(s) alternate between ON and OFF
Once I finished my second adjustment layer I created a third adjustment layer. For this Adjustment Layer, I was to change the screen aspect ratio to match the old TV settings (4:3).
11) RMB in Composition timeline -> new Create Adjustment Layer (Name ADJ03)
12) ADD -> Motion tile (to 4:3 crop our footage)
-> Set Output width to 75
I downloaded the Subtle02.mp4 video of the classroom (Which is where I got the Woman in the beach video from.). I played around with the blending modes to see what I felt fitted the best. I went with Color Dodge. I used the blending modes under "Layer > Blending Mode > Color Dodge".
13) DRAG in Subtle02.mp4 under the adjustment layers as the top footage
-> Set BLENDING MODE to Colour Dodge, Screen or Add. See what you prefer.
14) To save as a PRESET for future use
-> Select all effects, RMB click and SAVE AS PRESET. Name Accordingly (Premiere Pro)


Overall the workshop was great and it gives good insight on how to create a VHS footage effect in After Effects. This will be needed from us when creating our board game commercial in a 80s/90s form.


Comments