VFX for Horror Trailer VR: The Place That No One Speaks Of.
- Cade.M
- Oct 10, 2019
- 9 min read

Updated: May 25, 2020
On 20/09/2019 I started working on my Horror VR Trailer in After Effects. I created a new composition and selected my footages and sounds from file explorer. Before selecting my files I created a new comp. Afterward I implemented my footage files onto the timeline and muted them all as there was noise on each footage.
I gathered the sound clips and placed them onto the timeline appropriately. I tried my best to remember the script off by heart and then added sound effects such as door creaking and running (well I added this later on in AE.)


The way I prioritized my progress on the trailer was: Add footage, screen effects, sound clips, and sound effects > review my video > thoughts on pros and cons, and what's missing. > edit the footage, sound > make an intro and other comps > review the video again. Once I was satisfied and others thought my video was at to a good standard, I would proceed to the Visual FX side of things. When I made some progress on the Horror Trailer for VR I was going to do the VFX. I tried to find the "Mocha" plugin under "Effects and Presets" however I couldn't find the plugin at the time.
I had a lot of ideas to work within After Effects due to my past experience in AE which gave me an advantage. A few ideas we're scrapped such as the non-vocal message in the comp which I will talk about in the next few paragraphs. The curly whirls wave effect on the entrance of the house. Why I did this effect in the first place because I thought it was cool and it builds mystery and tension in the house. Regardless, this didn't work.


So what I did was I cropped and trim out the unnecessary parts of the video and sound out. This didn't take that long mostly for the sound as it was easy to tell to crop the beginning and end of the video. On top of that I would also go to "Edit > Split Layer." Mainly because I did change video opacity, sound volumes (.DB), video effects (such as VR Digital Glitch which was mostly used when Harvey/The Monster occurred.)
When it came to screen effects, I implemented two new fonts to go with the horror theme for the trailer itself. Friday the 13th and Stranger in the Night were the horror themed fonts that were used in for VR trailer. It was incredibly simple. This was copyright free. Same applied for the music and sound effects that have been used throughout.


I asked my team mates and teachers to review my movie. They told me what was good and bad. What needs to be fixed. To be honest, this was a procedure of improving my project. This is where the opinions come in. One thing Luca mentioned was that in one of my comps. I had created a message from the monster itself.
Saying:
"You aren't alone", "You are being watched", "You will be haunted"
The message itself takes too long and it breaks the tension of horror and makes it anti-climatic in a sense.
I was advised to go do some audio recording with a Zoom Recorder. So on the 26/09/2019, I asked Danny if I could use the Zoom Recorder and an SD Card with the USB card reader for one lesson. As soon as I got that I started to write down what I was going to say in my script. This didn't go well at the start because I didn't know the sound waves relied on inputs. On the zoom recorder, the red lights were shown on '1' and '2' but they had to be on input instead.
Honestly I do think my video will be much different from the others. I've used an intro, installed new fonts for the horror theme, added sound effects, produced a script from the audio recordings onto the trailer itself, etc.
Sam said to prevent the black screen from occurring in between the frames. I was told this because I had one on my intro. In a way this is to maintain consistency. I zoomed in the timeline countless times to maintain a consistent trailer as you see with trailers themselves they do not stop and there are no black frames. I would assume that's a standard for the trailers in the film and VFX industry.
On the 27/09/2019, I started off rendering my selected footage from the trailer. I selected the footage of Harvey's face. A few days before that I selected the clip and split layers. Why I did this was because it made sense for me. I used one layer of footage to add the special effects on Harvey's face in Mocha.
So I went onto to Mocha and selected my clip. Well.. the first couple of attempts didn't turn out well on the loading phase due to a couple of issues at hand. The local files CANNOT collar-ate with the files from the USB so what I did was I saved my Horror VR Trailer onto the local drives and from there I rendered it again. Then this built up onto another issue. The footage wasn't pre-composed and rendered. So I pre-composed the footage by selecting and then right-click > pre-compose. From there I rendered the video by the comp itself via the selected footage.


Here I selected my footage I wanted to use for face track so, after pre-composing, I used Animation > Track in mocha AE. Afterward I used Track Camera and set up the project naming it "Harvey's Face". Once the project was set up I went into project settings and from post-render action I did PNG Sequence. I went back into After Effects and created a solid fill that would track the motion of Harvey's face. Now this part was finicky. Leigh was helping me out on the tracking side of things by watching a tutorial to see where what went wrong and how to get the motion working. Leigh used the Keyframes for the tracking. I decided to give the tracking a try. All I had to do was track the camera and the fill by syncing in their movements with each other in order to maintain consistency with tracking.
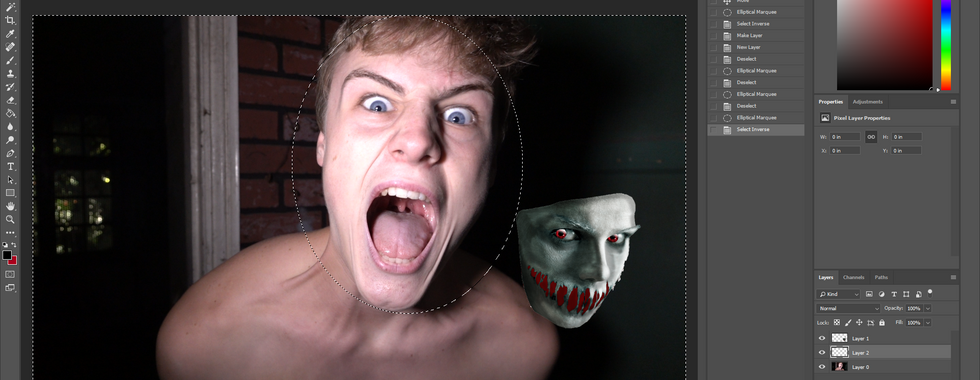
On 30/09/2019, I checked over Summer's progress and saw that she was editing Harvey's face in Photoshop. To add more to that from last week I saw Charlie was editing Harvey's face in Photoshop. I was also considering doing this in photoshop however the process might not be as linear compared to the videos we saw on the brief. I searched for a simple horror face that is transparent and a PNG format. Unfortunately, things didn't go as planned so what I did was I looked up:
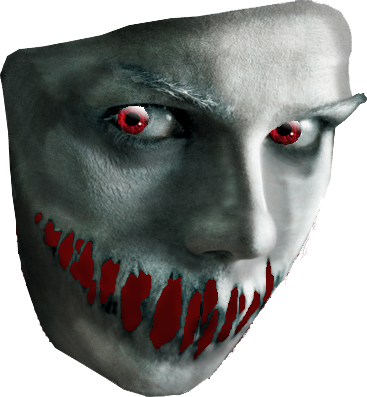
Horror Eyes, Face, and Mouth. I went into Photoshop and created a horror face with the materials I used. Quick selection, multiple layers, cropping were used. I placed the eyes at the back of the face but I erased the original eyes from the face I used by selecting and then select > inverse. Inverse selects the inside of the selection of the outline. Afterward I used the paint bucket to create a red background. From there I used the selection tool again from the background layer and erased the outsides of the face. Why I did this was because I wanted the dark red color of the mouth of the inside.
I asked my good friend Izzy to help me out with the shading. Being the talented artist she is, Izzy shaded in the areas for the lighting, contrast, and shading. She changed opacity and used the blur tool at the end.


From there flattened the image, I saved it and quick exported the file as a PNG.
I went back onto After Effects and used the tracking. I watched a 1-minute special video that really helped me with motion and face tracking: https://www.youtube.com/watch?v=ye7dTyOk6C8
After I did the tracking I slapped on the face on Harvey's face composition. Why a composition was made because I needed to use a comp for the tracking. Now the face itself whilst the proportions and angle was good at the start it got messy when Harvey's face went from the dashing-looking-at-you-from-the-right angle and then the face is straight. This was an issue for me due to the inaccurate proportions and angle of the face. So I asked Luca to help me out and see what I could do about it.


I went back onto Photoshop and got Harvey's face and the Scary face I made in Photoshop. Then from there I made multiple layers and most of the time I used the clone stamp tool. I was figuring out where the lighting would shine onto the face and where the contrast would be. The trickiest thing with the clone stamp to me for me was clone stamping the mouth itself. At first the perspective of the mouth looks wrong but I tried to justify it by rotating the scary face itself to Harvey's face. I tried not o be hasty about it so once the mouth as done on a separate layer which helped, I rotated the mouth to a degree where the proportions felt appropriate.
Essentially my task here was to use Harvey's face with the concepts of the scary face.


Once I was happy with full-on the face for Harvey, I exported the scary face (front view perspective) as a PNG and implemented that file onto After Effects. I went back to After Effects and followed the same procedures as I did with my first scary face.
The tracking of Harvey's face and the syncing of the scary face (front view perspective) was slightly finicky and trickier the second attempt around in comparison to the first attempt. When I locked the position, the face itself went out of position from Harvey's face as the scary face was on top. What I had to do in order to keep the scary face intact of Harvey's face position was that I had to adapt the anchor points.
After that was done I deleted the first ellipse tool mask. The reason why I did this because I didn't want two masks tracking at once. On top of that I had to delete the keyframes of the first mask right before the first frame of the second mask occurred.


What I had in mind for the scary face was that I wanted to add motion to the face itself. Luca introduced me to the Puppet Pin tool. I placed 20-30 pins on the face. The chins, cheeks we're left intact when pinned so there was less movement when the mouth occurred. I asked Luca to preview the scary face effect with pins. What he was thinking was that to get the mouth open and closed a couple of times before the big and wide opening from the mouth last.


I had no intention of producing credits due to trailers not including any form of credits at all. Personally that felt like it had a void in my heart and I wanted to credit everyone that was a part of our project. In and out of our group. We had a few people outside that helped us out such as Alex, Izzy, and Aiden. However I didn't use any of Aiden's sound clips but I will credit for the efforts. The reason why I didn't use his voice clips is that David used the same script as Aiden. On top of that, David's voice clips we're better (no bias).
After the credits were done everything was placed into one comp and got rid of the other comps in the render queue. The files formal was AVI. due to its massive file size. (Sitting at 21.1GB) I wanted to change it to an MP4. I was told to use Media Encoder however the computer I was on did not have Media Encoder installed. Due to this, I had found another way and it was a solution I had done before. So what I did after exporting and rending the file in after effects were that I opened up Premiere Pro. File > New Project and gave the project a name and booted up the project. From there I went onto File > Import > File Explorer. Found the "Horror VR Trailer."


Overall, I felt incredibly proud of my project. Most specifically the post-production side. I had noticed how well I did with my VFX skills in After Effects and due to my past experiences in After Effects. Photoshop went well too and I am proud of these horror faces I produced:


Thankfully we met the standards of the duration of the trailer between a minimum of 60 seconds to a maximum of 3 minutes.
One thing I didn't like however was that the deadline was nearing on the last day and I wanted to try and fit the title: "The Place that No One Speaks of." and add some pale gray skin to Harvey. It wasn't much but I felt like I could've spent a bit more time to it had the idea not occurred late after the face tracking.
I feel like most of the time when I haven't used Adobe software in a while. My memory and knowledge can get rusty and this was an occasion that it happened on. It only really occurred on the exporting aside from the h.264 format and render queues.
With everything out of the way here is the trailer!! I hope you enjoy it!

Comments