VFX Synoptic Project Part 3 - Post Production
- Cade.M
- Jun 8, 2020
- 12 min read

Updated: Jun 9, 2020
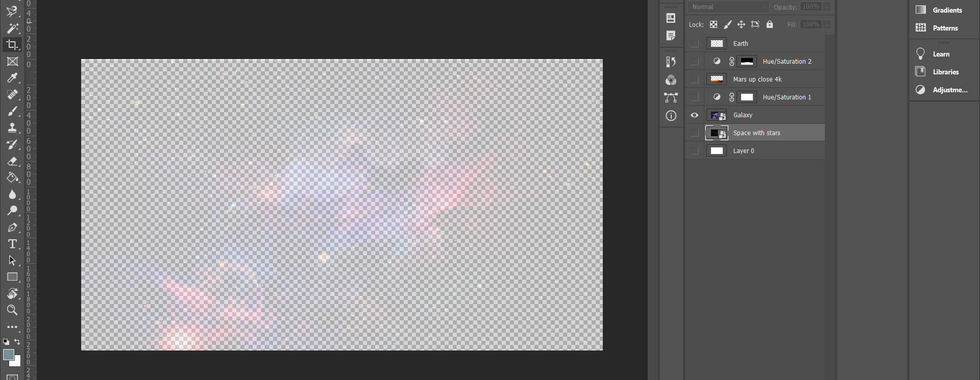
In our post-production stages, we've split ourselves into groups of 2. I and Aiden are responsible for matte paintings and Eduard and Sebastian are creating 3D assets for the VFX project. One major change is that the shots are going to be done in 3rd person with animations so there will be no actor for this. I've made multiple different matte paintings to get the feel of what the most suitable shots would be for the VFX before easter term, I created a shot on earth by photo bashing elements together. From there I would implement the matte painting onto Nuke. I got stuck at one point on Nuke due to the node arrows. I needed one more arrow to link it in with the matte painting arrows. After I came back from Easter break, I practiced creating and testing different ways to matte painting. I talked to my teammates and teachers to get opinions on each matte painting I had done there needed improvements such as image quality, saturations. This is the first space scene matte painting I created it needed a lot less saturation and better image quality for each layer so I saved more images. Originally I was going to include plenty of planets into one image but the scaling didn't make any sense after it was pointed and I came to terms that it looked awful. This one is better however it still needed improvements.

This is the second matte painting I had produced but at this phase, it's still a work in progress however a realistic and an improvement compared to my first matte painting

Before taking the matte painting file in Nuke I decided to do a couple of sketches of matte paintings to get the feel and perspective of what the scenes could look like here are 2 sketches I made:
Space Station hovering over the earth itself. Beforehand the lines weren't as clear to see for the human eye so I decided to highlight the lines by drawing over the original lines with a slightly bigger pen point.

Crumbled Earth.
A quick color sketch took about 10-15 minutes, a view of what a demolished earth could look like.

From there I would go into Nuke and then drag the PSD file into the nodes. Afterward, I used breakout layers as we breakout we see the rebuild of the actual matte painting layers from photoshop. They need to match so I needed to go about this in an efficient possible. I deleted the scrub nodes but kept the top nodes after that I added premult for each layer and then crop layer. This will pick up the layer for a better resolution for the premult itself.


Afterward, I created new nodes for the camera, scene, and scanline tracker. Then I added a 'card' node to each layer to the matte painting from there I took the 'card' node arrows which lead towards the scene node itself.

I changed my view from 2D to 3D.


Once all the card nodes were added, I pushed back the cards to fit into the focal length size of the camera.


With each card node, I was trying to fit them appropriately under the focal lengths of the camera alongside the aperture I had use focal length 50 and Happareture 24 for each card based on the settings of the camera itself.


I followed a youtube video which was quite helpful and useful. Here is the youtube video I followed in the process for Nuke matte painting setups: https://www.youtube.com/watch?v=feANAsdahRk
Once that was done I had made a second matte painting only later on it would be scrapped/unused for the scene. That being said, I still want to show my old matte painting regardless:

This matte painting shows us that the space station is hovering over the corrupted, abolished earth. We can see there are floating pieces, green seas, and red lava places surrounding the earth. Now it may not look like lava at first but that's because this was an unfinished matte painting. I won't lie, I was disappointed that this matte painting wouldn't be used however, I have been making a better matte painting and one that goes with the story of our VFX project.
Now for the next matte painting would be the surface of Mars in the lander's perspective.
For this matte painting scene, I gathered images and photo bashed them together into photoshop.


So at the background of the picture is the space and the milky way. I took inspiration and reference based on what Sam showed me, this is the image I use as a reference.

With that out of the way, let's move onto progress on how I created my image. As I created the image I produced a milky way on the background. For the foreground, I change the blending node to luminosity and added a sand dune to the foreground. Only later on there would be change s to the image itself.


The next thing I did is I added a space lander and a haboob. The haboob worked really well for my inspiration I asked the question of a specific name at the time not knowing that it was a haboob. The space lander from what I was told seemed a bit squashed, But this would get fixed later and would be brought closer into the foreground.
Now I had experimented around the dune by using the clone stamp to blend in and not including any shadows. Unfortunately that did not work as well as I expect.


One thing I needed to improve on was my sand dune. I used the clone stamp tool to go over the sand dune from the right-hand side. I was experimenting with the hue/saturation, color layer for the dune layer to blend


Once that was out of the way, I brought the PSD file into Nuke.
Now the process for the second matte painting on Nuke was weird. Having followed the previous steps to my first matte painting in Nuke for Hugo desk's youtube video; I did the same with my second matte painting. That being said, I wanted to remember it myself without clinging help onto the youtube video.
Now one trouble I had but was easy to fix was that the cropping node had the card cropped from the premult. Something you need to watch out for is when you see the second image. In the 2D viewer, there's a rectangle that is inside of the other rectangle. That rectangle shows us that this is the cropped piece. If you were to go into 3D viewer with the card and camera nodes turned on, you will see that if the cropped card hasn't been adjusted to full, the cards themselves show a cropped part of the image. Ideally, if you are doing what I wanted to do is to have a full image.
Another trouble I had was that the read file on Nuke had an error. I had tried to find the file to replace a new one. So what I did was I went back into photoshop again. Copied and pasted the layers onto a new photoshop file, saved the psd file and then brought the new file into Nuke then breakout layers and so on.


Something else I was told about my second matte painting was that space landers' shadow didn't blend in compared to the other shadows from the matte painting. I experimented with the shadows to get things right and made them match the other shadows in mars.


The shadows at the time were too dark and blue so I needed to tone it down. I toned down the opacity, added another shadow in case the shadow was too light, and then merged the layers together.


After trying to use different blending nodes, hue/saturation techniques to perfect the space lander shadows. I perfect the shadow. I was talking to Sam and Luca about this whilst I was trying to create a perfect shadow to fit into the mars scene.
Once that was done, I went back into Nuke and did breakout layers on the read node. Now I did this because I needed to bring in a new version of the space lander card node with the shadows. Which was simple and easy.


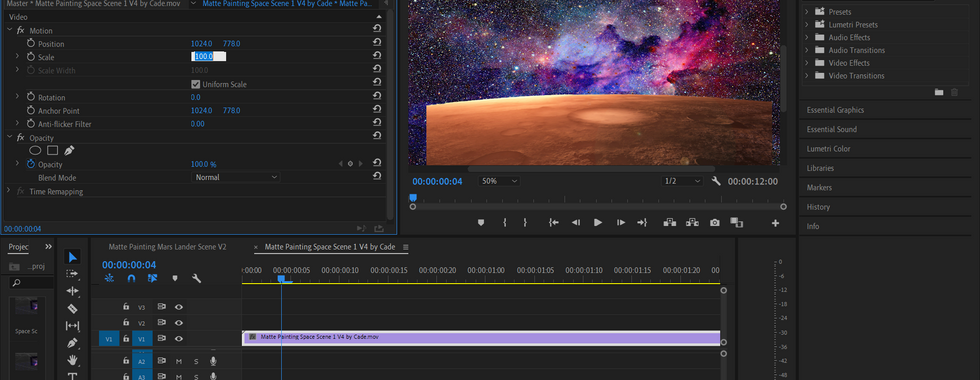
On google hangouts, I was having a team conversation with Eduard about adding my space lander matte painting to the laptop (3D Asset) with a screen glitch effect. By doing this, I opened up Adobe Premiere Pro. I had genuinely dragged my photoshop file into Premiere Pro to create a 20-second sequence of the mars lander with on and off-screen glitch effects. The reason why I wanted the screen glitch effects to occur at random times was that I wanted to create an inconsistent and incompetent piece of camera that monitors Mars. By any means, it was an easy task for me.


Afterward, I was thinking of how to create a VFX breakdown showreel. It took me a while to think about it but having watched the showreels for reference, the picture became clearer to me. I brought my matte painting into Premiere Pro however this time, I used one image to represent one layer of matte painting from Photoshop. Let's take a step back before we get into Premiere Pro. For photoshop, I opened up the matte painting files. Then I used the eye viewer layer tool on photoshop to hide every image but one image. I did this with every layer so I know that the matte painting is formed to a showreel when I create into Premiere Pro. Once that was done I proceeded to use Premiere Pro and drag all the images into the timeline. The first image in itself is the background then I bring my galaxy, then haboob, then the mars surface and space lander. I made slower screen wipes first but was told from Sam in Google Hangouts to half the amount of screen wipe speeds on each one. So I did that. Originally, they were 1 second and 10 frames so I did it to 15 frames instead. Once that was done, I exported the video in Media Encoder and gave the green light to queue and export out the video into .mp4


Here are the VFX Showreel videos I made: https://www.youtube.com/watch?v=404Ur8U0AZY
From there, I started to get into the rendering process. I was stuck on this until Sam told me about the write node. The write node lets you write files into the local drives onto your computer. I had created a render.
To do rendering, this method needs to be using the camera nodes. On the top of the viewer node bar, you'll notice there's a "default" type. You can change this by using a different view/perspective. I changed mine to "camera1". From there, I used the "Write" node and type in the file: "Matte Painting pace Scene 1 by Cade.mov. Usually, I would name them based on the .nk files I was working with. One thing that's important to render a file is that you need to end the file name with a file type. In my case it's .mov


The next process of rendering that I needed to do was creating a VFX breakdown with a camera. Now I created another camera and then created a backdrop node to place the breakdown camera inside the backdrop.
When creating keyframes for the breakdown camera, I set positions in between every 10-20 frames for the camera position themselves regarding the two matte paintings.


Back on the 26th of May, I experienced writing and rendering issues for the first matte painting. Sam gave me some advice on how to solve them. One of them was that I had to change up the structure of the node graph. Place the viewer tab onto ScanlineRender rather than the read node itself and the camera tracker was removed from the node graph.
I solved the issue by writing the files in a different folder path. Now when you do write into a new folder path the rendering takes the longest on the first try. After the first attempt of rendering, it won't take as long after you rendered from the new path itself.
After experiencing rendering issues, I had to render out the breakdown camera next. From here, I would create a render of the breakdown via flipbook. To access it on the bottom of the viewer tab, you have an icon that has a hole inside of a square. Click on that and this will render out a flipbook. If you have the "no flipbook" option on making sure to turn it off as this will create your own breakdown render from breakdown camera. After the first render, I created another render. One important thing to do when rendering out a flipbook for the second time is to make sure to include ".####.jpg" at the end of the file.
Once I got the problems out of the way such as breaking the illusion of matte paintings and camera positions in Nuke. I opened up Premiere Pro and dragged the files I needed into the timeline area.
Some tricks I did was that I changed the duration of all the camera breakdowns files into 1 frame each. I did this by selecting all. Right-click > Speed/Duration. I also changed the scaling on the camera breakdown as it didn't fit into the screen. So I went into effect controls > motion > scale (100% > 200%)


To get things into shape, I uploaded multiple videos of the Matte Painting VFX breakdowns on Youtube. The first attempt I showed off what I did so far and I wanted opinions around it.
Here are the first attempts:
First Matte Painting issues: - Sam had told me that the galaxy stars card was stretching and rescaling which was something I noticed too.
I fixed this by changing the focal lengths and h.appreture of the camera. Then the whatever the camera settings were I applied the same for the cards as well. (Did this later on the second attempt) - The camera needs to be closer to the matte painting preventing breaking the illusion. Furthermore, the camera themselves needed to be slower compared to the speed they were going at (applies to both MPs in my case.)
Second Matte Painting issues: - Sam told me that the milky way layer lost its way or blending into the layers. It was a very bright blue milky rather than a darker blue milky that blends into space itself. I fixed this issue by going into photoshop and merging the 'milky way' layer with the 'galaxy' layer. From there I did breakout layers in Nuke and reorganized the card again.
Once all the errors were fixed I exported the videos and uploaded them onto Youtube.
Here are the second attempts:
Second matte painting was basically done though, for my first matte painting, I missed upon the fact I forgot to change the scaling on the card so of course, I changed the focal lengths and h.apperture prior to what was mentioned earlier on in the blog. Final attempts Matte Painting #1 with VFX camera breakdowns
Matte Painting 2 Mars Lander VFX Breakdown FINAL (Non-Camera) version
As I finished my video uploads on YouTube I uploaded my final versions of the matte paintings onto OneDrive.
After that was done I added my own content/contribution onto a PowerPoint presentation and tried to upload onto OneDrive which I was facing issues with I made sure I closed the presentation myself. I tried uploading again multiple times and it didn't work. So what I had done instead was I uploaded the presentation onto Google Drive. Once I uploaded I shared the file between me and my teammates. I gave word out to the team that I had to upload the presentation onto Google Drive given the fact I was facing errors and my mediocre internet wouldn't upload.
Overall: Facing lots of changes and turns into my Synoptic path it has been a hectic yet interesting one of a kind project. At first, I wasn't that fond of doing a VFX project but in the end, it seemed better suited for me and became abstained. Intentionally, I wanted to go onto a games synoptic project but failed to get in. I enjoyed doing the VFX project more than I expected to and I think I was better off doing the VFX project more than anything. This was proof of that because I had done work experience for a game prototype and I was struggling in the games project more than the VFX project. Still, something that upset right on the start of Synoptic was that it seems like I was unwanted and uninvited to any group.
Things couldn't go the way they wanted to but I've come to accept the terms in life that everything is not about me and you won't get what you want all the time. I have been trying to grasp that and all things considered, I need to be more considerate and thoughtful for other people.
I made changes into the Trello board itself by listing every task as finished:

I've also made changes to the GANTT chart (via Google Spreadsheet) as well based upon the working speeds and efficiency we've all made as a team.

And now we prepare ourselves for the presentation coming up on Monday, I've also added my own content into the presentation for Monday.
Update: We had our presentation meeting on Monday with Sam and Leigh. Personally speaking, the meeting turned out to be fine and well aside from technical issues of course. Such as lack of audio on video (via screen share) which has it on the video but you couldn't hear on screen share. I also had to leave the meeting at one point in the meeting, my internet connection cut out the audio, and the zoom meeting froze out. I came back and had our talk. All things considered, some did well than others. I admitted to Leigh at the end I had enjoyed the project more than I expected and I liked it. I came to accept that you can't have everything you want. You just have to accept things for what they are.
We showed the video at the beginning of the presentation and then showed our own contributions to the project itself after the video.
Here's the video that was put together by Eduard: https://www.youtube.com/watch?v=_wuHyvBbXJM&feature=emb_title


Comments